Mixed Metallic Nail Charms: DIY Salon Guide for Pros
Get pro-level results with mixed metallic nail charms—crosses, bats, spiders and rhinestones. Step-by-step tips for salon-quality application at home or in the studio.
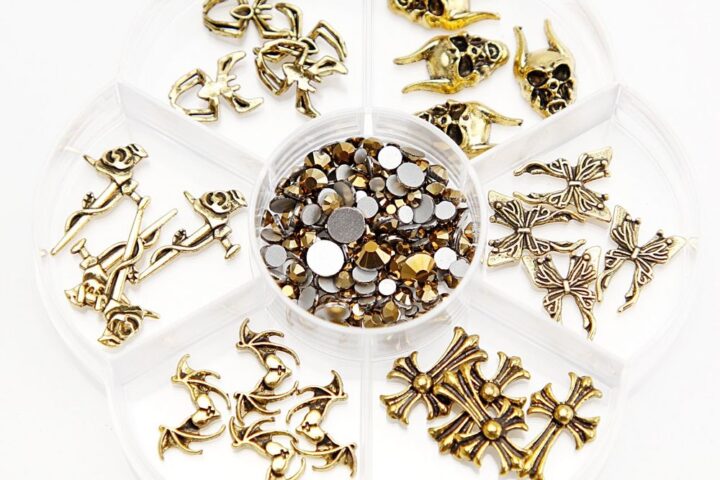
Small accents make a big statement: mixed metallic nail charms combine antique crosses, bats, butterflies and spiders with round rhinestones to create high-impact gothic, Y2K or Halloween looks. This how-to guide walks you through achieving salon-grade results with these charms whether you’re working at home or in a professional studio.
What’s in the pack and why it matters
The set features mixed metallic motifs—crosses, bats, butterflies and spiders—paired with round-shaped rhinestones for sparkle and texture. Order the exact mixed assortment directly from the product listing, shown as metallic nail charms set. A compact assortment like this lets you mix motifs across nails for cohesive themed sets or pick single-accents for minimalist drama.
Tools and prep for professional-looking application
Preparation is the foundation of a lasting charm application. Gather these essentials:
- Clean nails: remove old polish and wipe with a lint-free wipe and alcohol.
- Base and top coats: choose a base that bonds well, and a durable top coat or builder gel for locking charms.
- Application aids: fine tweezers or an orange stick, a dotting tool for adhesive placement, and a small curing lamp if you use gel.
- Adhesives: cosmetic-grade nail glue for quick set, or gel/resin for longer wear.
Step-by-step: applying charms for salon-quality results
Follow these steps for secure, neat placement that reads professional.
- Prep the nail surface. After shaping, buff the nail plate lightly and remove dust. A slightly roughened surface improves adhesion.
- Apply base color or builder layer. Paint or sculpt the nail as desired and cure or dry according to your chosen system.
- Plan placement. With tweezers, lay out the charm composition on your workspace. Use rhinestones to anchor larger metallic motifs visually and structurally.
- Adhere the charm. For instant holds, place a dot of nail glue where the charm will sit and set the charm with tweezers. For a smoother finish and extra security, embed the charm into a layer of tacky gel or resin and cure.
- Seal the edges. Lightly apply top coat around the charm’s perimeter or encapsulate with builder gel to prevent snagging. Finish with a full top-coat layer over exposed rhinestones to secure them further.
Design tips: mixing motifs for unique looks
Because the set contains several gothic and retro motifs, you can shift the mood by placement and pairing:
- Accent nails: Use a single cross or spider on the ring finger for a moody focal point.
- Balanced layouts: Pair a bat with a small rhinestone cluster to keep an even visual weight across the nail.
- All-over drama: Alternate metallic motifs across nails for a themed set—great for Halloween or goth-inspired editorials.
- Minimal glam: Place a tiny rhinestone near the cuticle and a small butterfly at the tip for a subtle nod to the set’s variety.
Who this set is best for
This assortment suits nail technicians and skilled at-home artists who like creative, statement-making accents. It’s particularly helpful for clients seeking gothic, retro, Y2K or seasonal (Halloween) looks. The variety of shapes lets professionals quickly customize sets without sourcing individual charms.
Care, removal and safety notes
Because metallic charms and rhinestones add texture, advise clients on wear and care to extend longevity:
- Avoid prolonged contact with harsh chemicals; wear gloves for household chores.
- If a charm loosens, remove it cleanly and re-secure with nail glue or re-encapsulate with builder gel.
- For removal, gently buff the top layer and soak with appropriate remover—do not pry charms off, which can damage the natural nail.
- Keep adhesives away from skin and follow manufacturer safety guidance for glue and gel products.
Key features in context
The visual contrast between metallic motifs and round rhinestones makes this set easy to apply in layered designs. Small metallic shapes like crosses, bats and spiders act as bold focal elements, while rhinestones add polish-friendly sparkle for editorial or everyday wear. The assortment format speeds up service time and encourages creative mixes that fit many client styles.
Quick pro tips and finishing touches
- For a flush finish, slightly flatten the base of larger charms with a file before adhesion so they sit flat on the nail plate.
- Use a tiny dab of clear gel under the charm’s center as an invisible pedestal—this reduces rocking and makes top-coat sealing easier.
- When photographing finished work, angle light to highlight both metallic shine and rhinestone sparkle for best effect.
These mixed metallic nail charms deliver fast creative range for both studio clients and dedicated at-home artists. The set is affordably priced at $7.99 and offers a simple way to elevate nail art with gothic and retro accents—available through Dynamic Nail Supply for those stocking their kit.
Ready to experiment? Start with one accent nail and build a signature look using the motifs and techniques above to achieve true salon-quality results.